
High Availability Using DRBD
Let’s take a look at the first option, which creates a high availability environment between two VitalPBX instances.

In this High Availability environment, we will be using DRBD or Distributed Replicated Block Device. This involves ensuring critical systems and services are available with minimal downtime in case of a failure. DRBD enables real-time data replication between nodes to
ensure data availability and integrity.
First, let’s look into the requirements for this type of High Availability.
-
Physical Infrastructure and Networking - Two or more identical nodes (servers) to
implement redundancy. These need to have the same hardware specifications and
VitalPBX licensing. This means that if you are using a Carrier Plus license, each server
will need its own license. This will ensure that both servers have the same permissions
when the configurations are being replicated. We also need a reliable and low-latency
network connection between the nodes. This can be a dedicated replication network
(preferred) or a shared network if it’s of high quality. -
Operating System / VitalPBX version - Nodes should run the same operating
system using the same version and the same version of VitalPBX. -
Disk Partitioning - The storage device to be replicated should be partitioned and
accessible on both nodes. Each node should have sufficient storage space to
accommodate replication and data. -
Network Configuration - Each node should have static IP addresses and resolve
correctly in the local DNS system or in the /etc/hosts file of the other node. Host
names should be consistent across nodes. -
DRBD - Install and configure DRBD on both nodes. Configure DRBD resources that
define which devices will be replicated and how replication will be established. At the
time of installation leave the largest amount of space on the hard drive to store the
variable data on both servers. Define node roles: primary and secondary nodes.
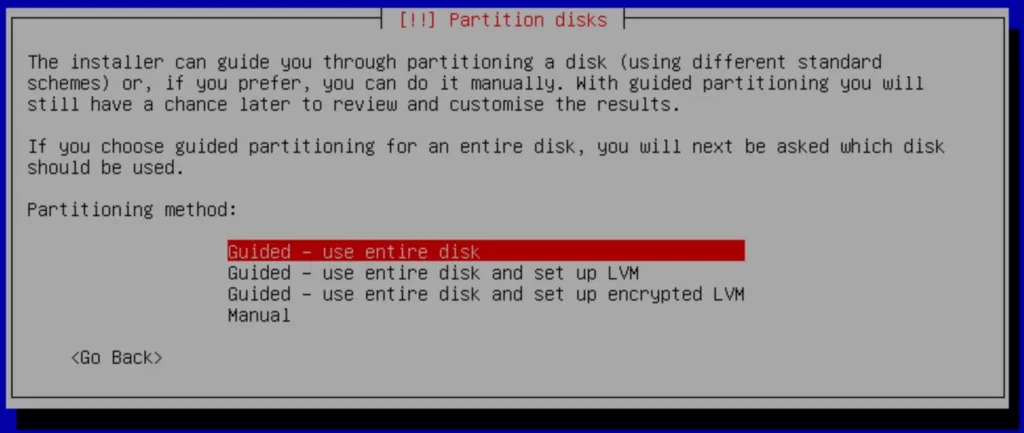
With these requirements met and understood, we can start by installing Debian and VitalPBX on two servers. You can start by following the Installation Section for this guide. When you get to the partitions part of the installation, you must select Guided - use the entire disk.

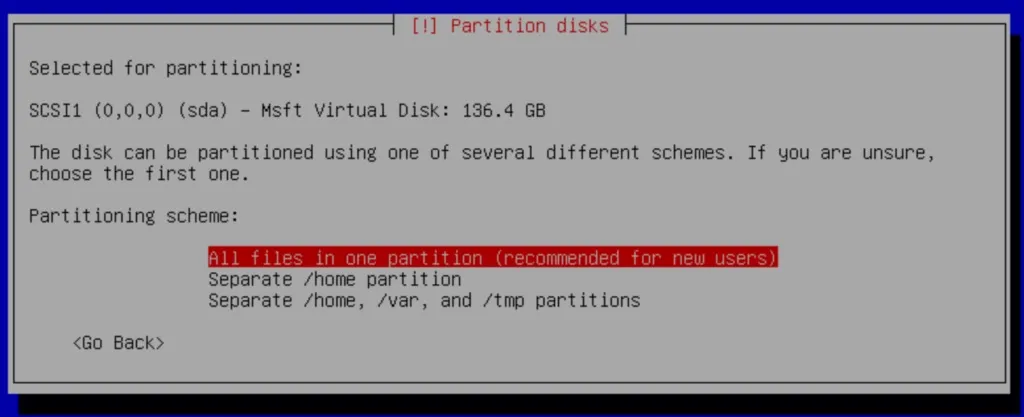
Next, select the option All files in one partition (recommended for new users)
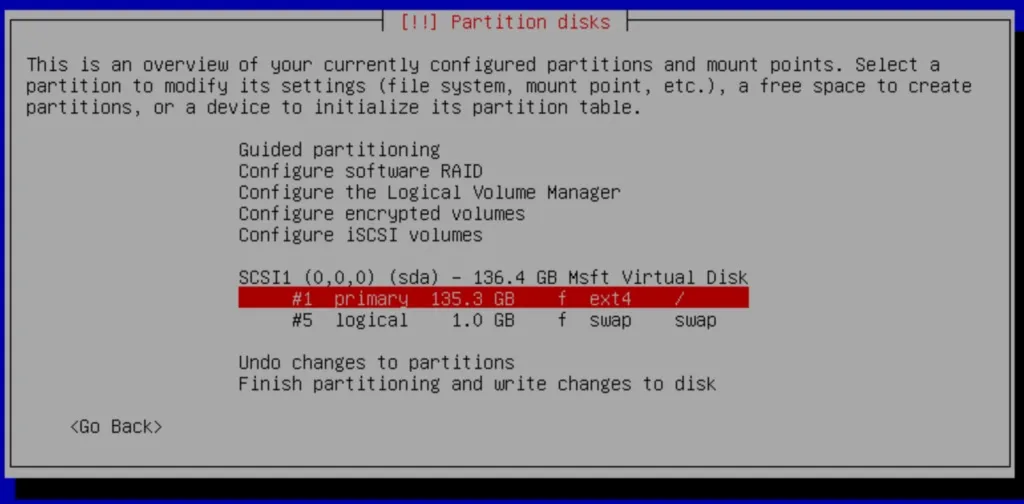
On the next screen select the #1 Primary partition to delete it.
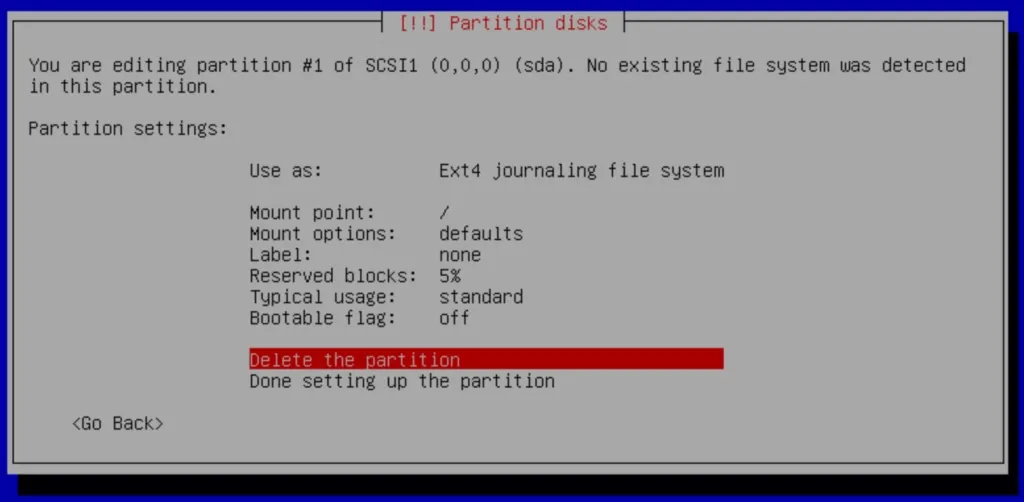
Delete the partition #1 Primary partition to create Free Space.
With the partition deleted, we select the pri/log FREE SPACE option.
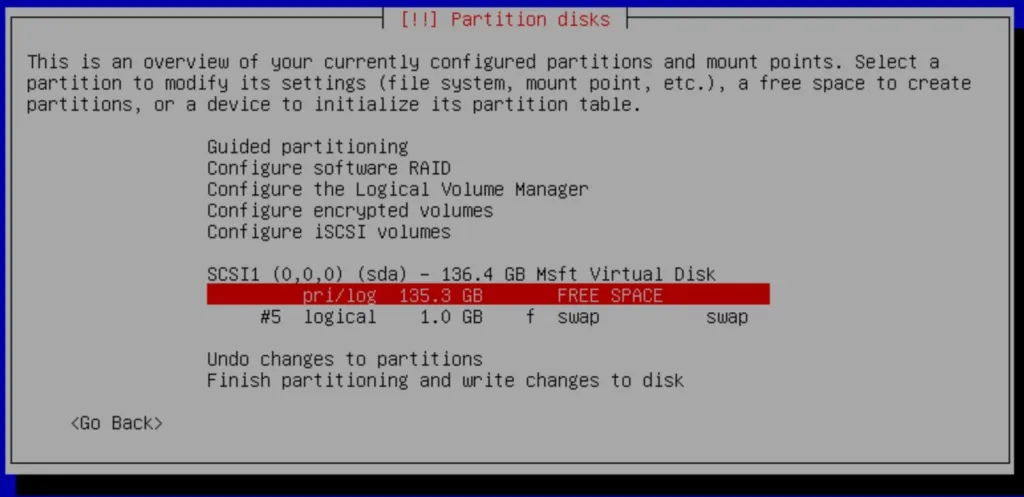
You will now select how to use the free space. Select the Create a new partition option.
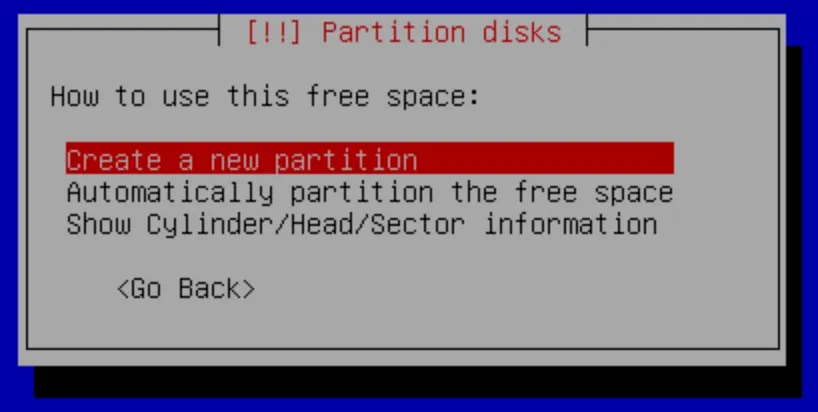
Now, change the capacity of this partition to 20GB. This partition is solely for the OS and its applications. We make sure that it has enough space for the future. As a rule of thumb, this partition must be at least 20GB or 10% of your total storage space. So if you have a 1TB drive, you would allocate 100GB, for example.

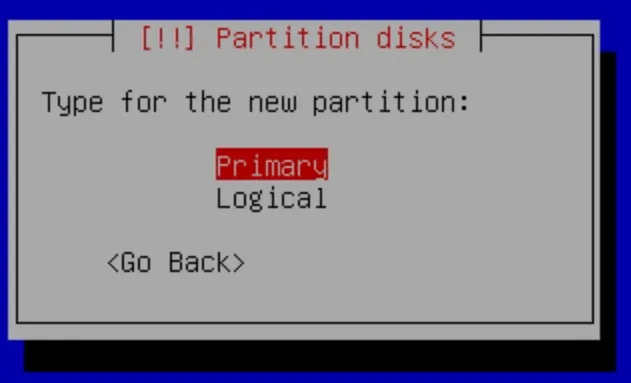
We then define this partition as a Primary Partition. Afterward, we will select the location for this partition to be the Beginning.

With this set, we will be shown a summary of the changes to this partition. Select the option Done setting up the partition.
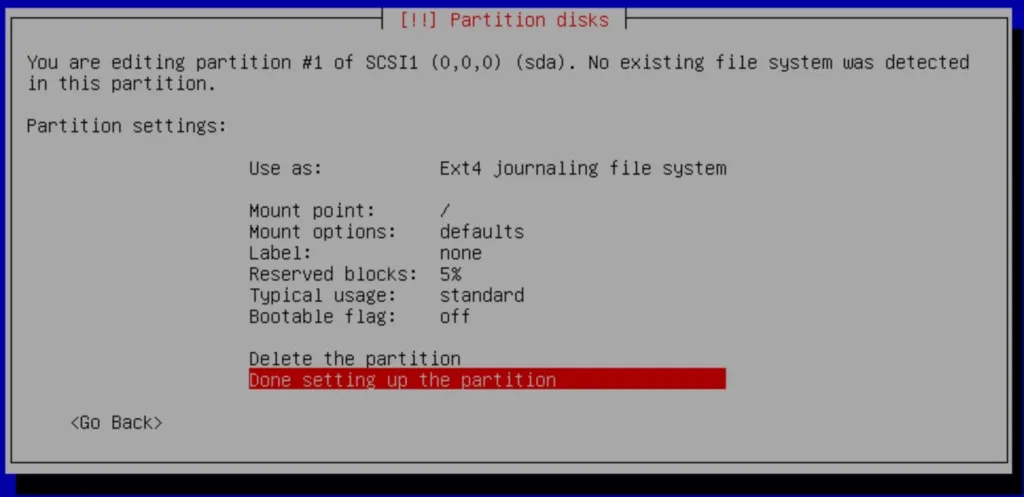
Next, we are shown the partitions to be set on the drive. Select the option Finish partitioning and write changes to disk.
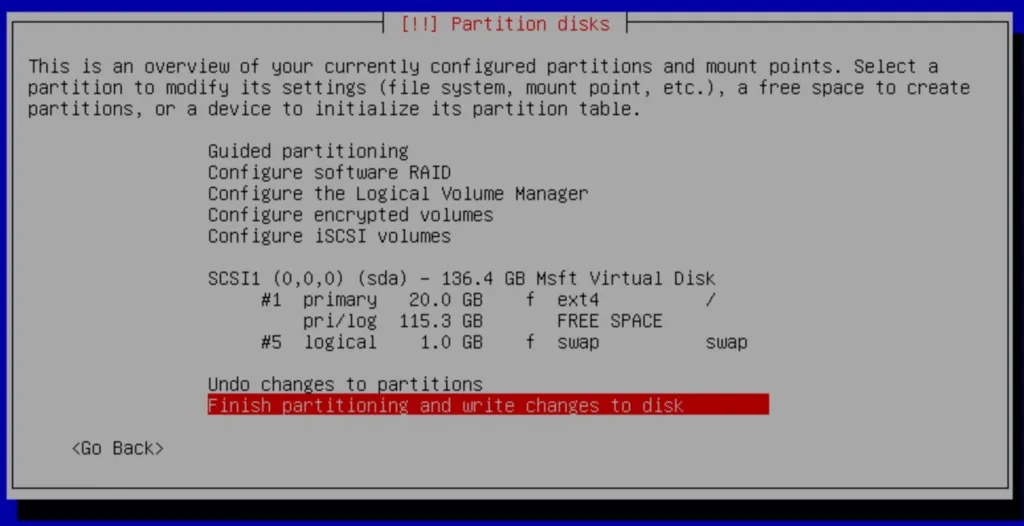
Later we will be using the rest of the FREE SPACE that is available.
Finally, we are shown a summary of the changes to be made on the drive. Select Yes to the question: Write the changes to disks.
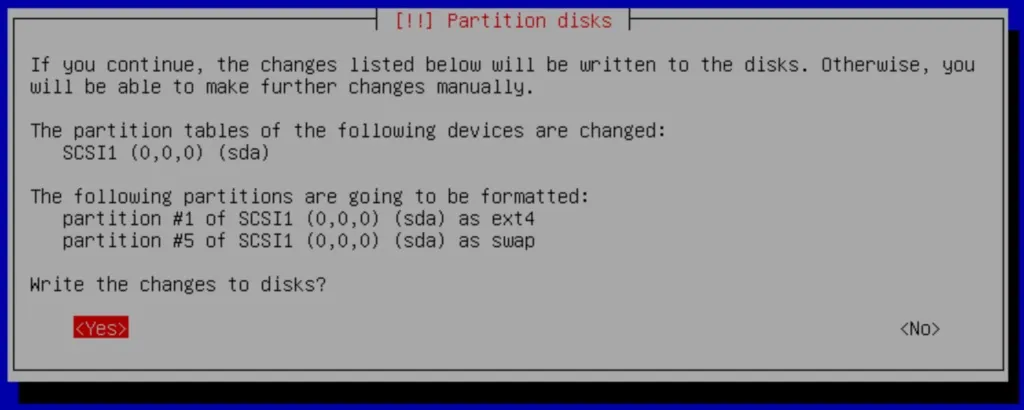
You can then proceed with the installation as normal, you can follow the steps in the Installation Section for this guide. This includes the installation of VitalPBX using the VPS installation script.
Remember, the installation process with the partitioning needs to be done twice. One for each server in our high-availability environment.
With the installation done, we can start configuring our servers. It is a good idea to write down the networking information beforehand so we can work more orderly in our high-availability environment. For this guide, we will be using the following information.
| Name | Primary Server | Secondary Server |
|---|---|---|
| Hostname | vitalpbx-primary.local | vitalpbx-secondary.local |
| IP Address | 192.168.10.31 | 192.168.10.32 |
| Netmask | 255.255.255.0 | 255.255.255.0 |
| Gateway | 192.168.10.1 | 192.168.10.1 |
| Primary DNS | 8.8.8.8 | 8.8.8.8 |
| Secondary DNS | 8.8.4.4 | 8.8.4.4 |
Next, we will allow remote access using the root user on both servers. This will allow us to SSH login with the root user.
From the CLI, we will use nano to edit the sshd_config file.
root@debian:~# nano /etc/ssh/sshd_configChange the following line.
#PermitRootLogin prohibit-passwordWith the following.
PermitRootLogIn yesSave the changes and exit nano. Then, restart the sshd service
root@debian:~# systemctl restart sshdWith this, you can now SSH login with the root user and password. This will make it easier to copy and paste the commands from this guide. Remember, this has to be done on both servers.
Once you are logged in with an SSH connection, we will set the static IP addresses for both servers. For this, we will use nano to modify the interfaces configuration file.
root@debian:~# nano /etc/network/interfacesHere, change the following lines.
# The primary network interfaceallow-hotplug eth0iface eth0 inet dchpFor the Primary Server, enter the following.
# The primary network interfaceallow-hotplug eth0iface eth0 inet staticaddress 192.168.10.31netmask 255.255.255.0gateway 192.168.10.1For the Secondary Server, enter the following.
# The primary network interfaceallow-hotplug eth0iface eth0 inet staticaddress 192.168.10.32netmask 255.255.255.0gateway 192.168.10.1Note: Your installation may have a different name for the primary network interface. Make sure that you are using the correct name for your interface
Next, we will install dependencies on both servers.
root@debian:~# apt -y install drbd-utils corosync pacemaker pcs chrony xfsprogsWith the dependencies installed, we must set the hostnames for both VitalPBX servers. For this, we go to Admin > System Settings > Network Settings in the VitalPBX Web UI.
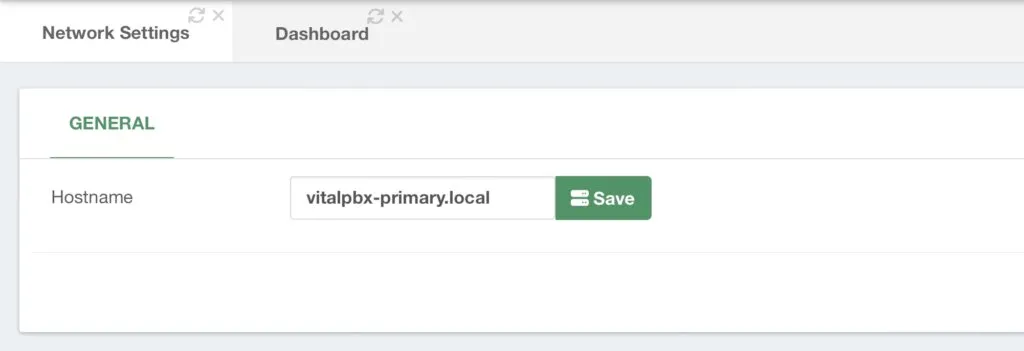
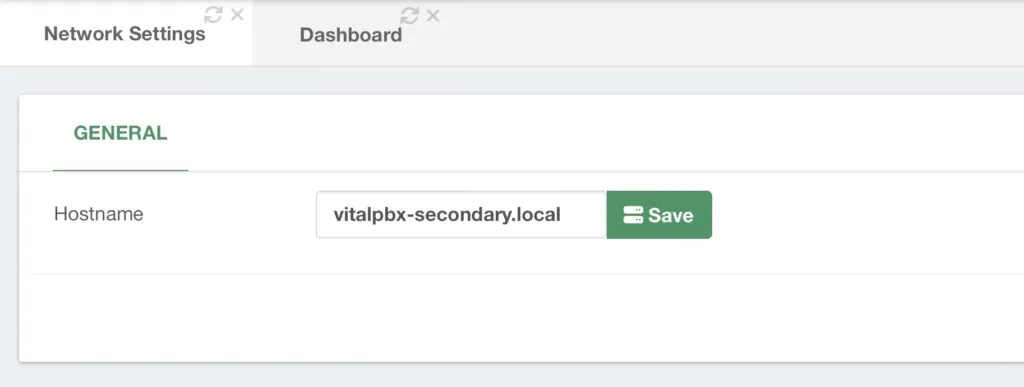
After setting the hostname, click the green Save button. With the hostname set from the Web UI, we will now configure the hostnames in the hosts file for each server.
Set the hostname on the Primary Server with the following command.
root@debian:~# hostname vitalpbx-primary.localAAnd in the Secondary Server as follows.nd in the Secondary Server as follows.
root@debian:~# hostname vitalpbx-secondary.localAfterward, on both servers modify the hosts file using nano.
root@debian:~# nano /etc/hostsAdd the following lines.
192.168.10.31 vitalpbx-primary.local192.168.10.32 vitalpbx-secondary.localThis way, both servers will be able to see each other using their hostnames.
Now, we will create a new partition to allocate the rest of the available space for both servers.
For this, we will use the fdisk command.
root@debian:~# fdisk /dev/sdaAnswer as follows on the presented prompts.
Command (m for help): nPartition type: p primary (3 primary, 0 extended, 1 free) e extendedSelect (default e): pSelected partition 3 (take note of the assigned partition number as we will need it later)First sector (35155968-266338303, default 35155968): [Enter]Last sector, +sectors or +size{K,M,G} (35155968-266338303, default 266338303): [Enter]Using default value 266338303Partition 4 of type Linux and of size 110.2 GiB is setCommand (m for help): tPartition number (1-4, default 4): 3Hex code (type L to list all codes): 8eChanged type of partition 'Linux' to 'Linux LVM'Command (m for help): wThen restart both servers so that the new table is available.
root@debian:~# rebootWith the servers rebooted, we will proceed with the HA (High Availability) cluster configuration.
Now, we will create an authorization key for the access between both servers. This way, we can access both servers without entering credentials every time.
Create an authorization key in the Primary Server.
root@debian:~# ssh-keygen -f /root/.ssh/id_rsa -t rsa -N '' >/dev/nullroot@debian:~# ssh-copy-id [email protected]Are you sure you want to continue connecting (yes/no/[fingerprint])? yes[email protected]'s password: (remote server root’s password)Number of key(s) added: 1Now try logging into the machine, with: "ssh '[email protected]'"and check to make sure that only the key(s) you wanted were added.root@debian:~#Next, create an authorization key in the Secondary Server.
root@debian:~# ssh-keygen -f /root/.ssh/id_rsa -t rsa -N '' >/dev/nullroot@debian:~# ssh-copy-id [email protected]Are you sure you want to continue connecting (yes/no/[fingerprint])? yes[email protected]'s password: (remote server root’s password)Number of key(s) added: 1Now try logging into the machine, with: "ssh '[email protected]'"and check to make sure that only the key(s) you wanted were added.root@debian:~#Now, we can proceed in two ways. One is using a script we made, or you can follow the manual step-by-step. If you proceed with the following script, you can skip all the steps until you reach the add-on installation in the lesson.
Afterward, you can download and run the following script from the Primary Server, using these commands.
root@debian:~# mkdir /usr/share/vitalpbx/haroot@debian:~# cd /usr/share/vitalpbx/haroot@debian:~# wget https://raw.githubusercontent.com/VitalPBX/vitalpbx4_drbd_ha/main/vpbxha.shroot@debian:~# chmod +x vpbxha.shroot@debian:~# ./vpbxha.shYou will then be prompted to enter the information for the servers in the cluster.
************************************************************* Welcome to the VitalPBX high availability installation ** All options are mandatory *************************************************************IP Server1............... > 192.168.10.31IP Server2............... > 192.168.10.32Floating IP.............. > 192.168.10.30Floating IP Mask (SIDR).. > 24Disk (sdax).............. > sda3hacluster password....... > MyPassword************************************************************* Check Information ** Make sure you have an internet connection on both servers*************************************************************Are you sure to continue with these settings? (yes, no) > yesNote: The hacluster password can be anything of your liking. It does not have to be an existing password for any user in any node.
Note: Before doing any high-availability testing, make sure that the data has finished synchronizing. To do this, use the cat /proc/drbd command
The script will start configuring the HA cluster for you. CONGRATULATIONS! You now have a high availability environment with VitalPBX 4!
The following steps are if you want to proceed with the cluster configuration manually, rather than using the provided script. You can skip these steps if you decide to use the script and proceed to the add-on installation in the next lesson.
To configure the HA cluster manually, first, we need to configure the Firewall. This can be done by adding the services and rules from the VitalPBX Web UI. Here is the list of services we will configure. This needs to be configured in both servers.
| Protocol | Port | Description |
|---|---|---|
| TCP | 2224 | This protocol is needed by the pcsd Web UI and required for node-to-node communication. It is crucial to open port 2224 in such a way that pcs from any node can talk to all nodes in the cluster, including itself. When using the Booth cluster ticket manager or a quorum device you must open port 2224 on all related hosts, such as Booth arbiters or the quorum device host. |
| TCP | 3121 | Pacemaker’s crmd daemon on the full cluster nodes will contact the pacemaker_remoted daemon on Pacemaker Remote nodes at port 3121. If a separate interface is used for cluster communication, the port only needs to be open on that interface. At a minimum, the port should open on Pacemaker Remote nodes to full cluster nodes. Because users may convert a host between a full node and a remote node, or run a remote node inside a container using the host’s network, it can be useful to open the port to all nodes. It is not necessary to open the port to any hosts other than nodes. |
| TCP | 5403 | Required on the quorum device host when using a quorum device with corosync-qnetd. The default value can be changed with the -p option of the corosync-qnetd command. |
| UDP | 5404 | Required on corosync nodes if corosync is configured for multicast UDP. |
| UDP | 5405 | Required on all corosync nodes (needed by corosync) |
| TCP | 21064 | Required on all nodes if the cluster contains any resources requiring DLM (such as clvm or GFS2) |
| TCP, UDP | 9929 | Required to be open on all cluster nodes and booth arbitrator nodes to connections from any of those same nodes when the Booth ticket manager is used to establish a multi-site cluster. |
| TCP | 7789 | Required by DRBD to synchronize information. |
In the VitalPBX Web UI for both servers go to Admin > Firewall > Services. Add the services from the table above by clicking the Add Service button.
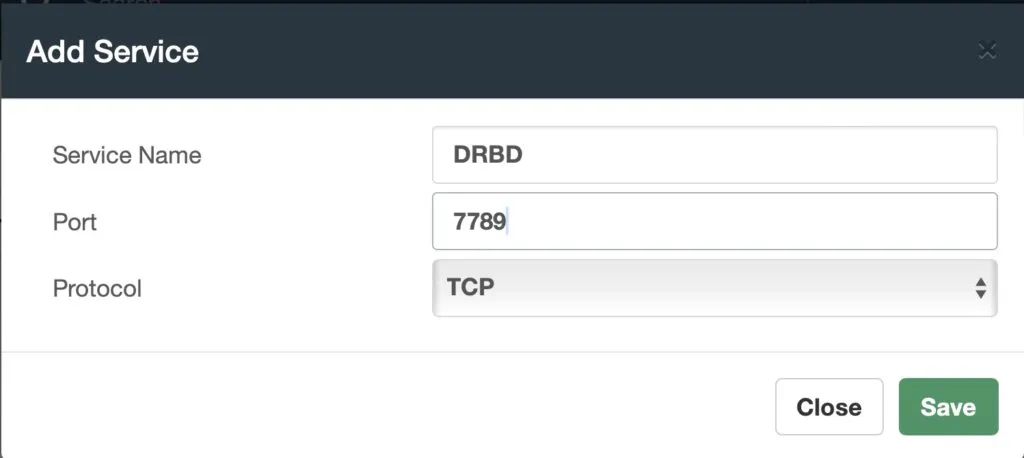
With all the services added, Apply Changes.
Next, we go to Admin > Firewall > Rules to add the rules to ACCEPT all the services we just created.
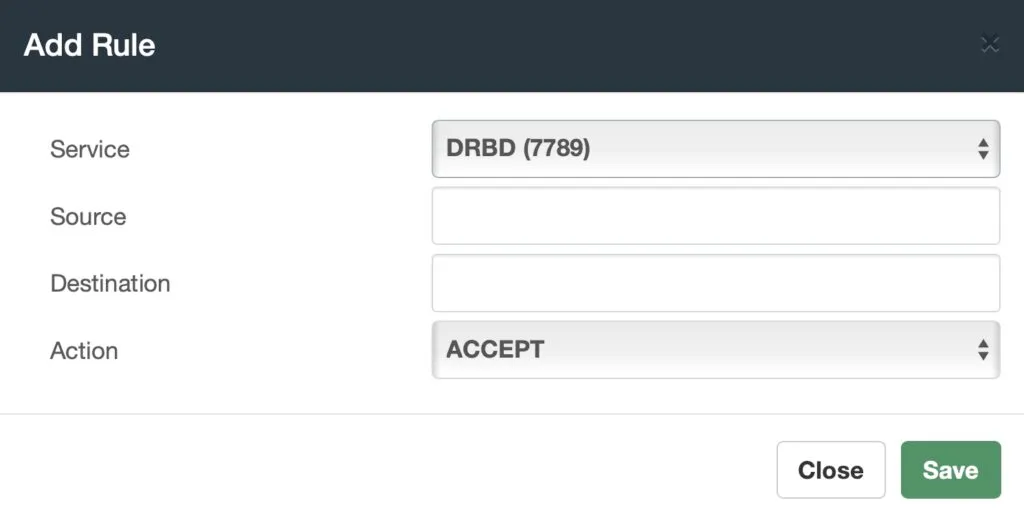
With all the rules added, Apply Changes. Remember, you need to add the services and rules to both servers’ firewalls.
Now, Let’s create a directory where we are going to mount the volume with all the information to be replicated in both servers.
root@debian:~# mkdir /vpbx_dataAfterward, we will format the new partition we made in both servers using the following commands.
root@debian:~# mke2fs -j /dev/sda3root@debian:~# dd if=/dev/zero bs=1M count=500 of=/dev/sda3; syncWith all of this done, we can proceed to configure DRBD on both servers. Start by loading the module and enabling the service in both nodes using the following command.
root@debian:~# modprobe drbdroot@debian:~# systemctl enable drbd.serviceThen, create a new global_common.conf file in both servers.
root@debian:~# mv /etc/drbd.d/global_common.conf /etc/drbd.d/global_common.conf.origroot@debian:~# nano /etc/drbd.d/global_common.confAdd the following content.
global { usage-count no; } common { net { protocol C; } }Save and Exit nano. Next, create a new configuration file called drbd0.res for the new resource named drbd0 in both servers using nano.
root@debian:~# nano /etc/drbd.d/drbd0.resAdd the following content.
resource drbd0 {startup { wfc-timeout 5; outdated-wfc-timeout 3; degr-wfc-timeout 3; outdated-wfc-timeout 2;}syncer { rate 10M; verify-alg md5;}net { after-sb-0pri discard-older-primary; after-sb-1pri discard-secondary; after-sb-2pri call-pri-lost-after-sb;}handlers { pri-lost-after-sb "/sbin/reboot";}on vitalpbx-primary.local { device /dev/drbd0; disk /dev/sda3; address 192.168.10.31:7789; meta-disk internal;}on vitalpbx-secondary.local { device /dev/drbd0; disk /dev/sda3; address 192.168.10.32:7789; meta-disk internal; }}Save and Exit nano.
Note: Although the access interfaces can be used, which in this case is ETH0. It is recommended to use an interface (i.e. ETH1) for synchronization, this interface must be directly connected between both servers.
Now, initialize the metadata storage in each node by executing the following command in both servers.
root@debian:~# drbdadm create-md drbd0Writing meta data...New drbd meta data block successfully created.Afterward, define the Primary Server as the DRBD primary node first.
root@debian:~# drbdadm up drbd0root@debian:~# drbdadm primary drbd0 --forceThen, on the Secondary Server, run the following command to start the drbd0.
root@debian:~# drbdadm up drbd0You can check the current status of the synchronization while it is being performed, using the following command.
root@debian:~# cat /proc/drbdHere is an example of the output of this command.

In order to test the DRBD functionality, we must create a file system, mount the volume, write some data in the Primary Server, and finally switch the primary node to the Secondary Server.
Run the following commands in the Primary Server to create an XFS file system in the /dev/ drbd0 directory, and mount it to the /vpbx_data directory.
root@debian:~# mkfs.xfs /dev/drbd0root@debian:~# mount /dev/drbd0 /vpbx_dataCreate some data using the following command in the Primary Server.
root@debian:~# touch /vpbx_data/file{1..5}Run the following command to list the content of the /vpbx_data directory.
root@debian:~# ls -l /vpbx_dataThe command will return the following list.
total 0-rw-r--r-- 1 root root 0 Nov 17 11:28 file1-rw-r--r-- 1 root root 0 Nov 17 11:28 file2-rw-r--r-- 1 root root 0 Nov 17 11:28 file3-rw-r--r-- 1 root root 0 Nov 17 11:28 file4-rw-r--r-- 1 root root 0 Nov 17 11:28 file5Now, let’s switch the primary node “Primary Server” to the secondary node “Secondary Server” to check if the data replication works.
We will need to unmount the volume drbd0 in the Primary Server and change it from the primary node to the secondary node, and we will turn the Secondary Server into the primary node.
In the Primary Server, run the following commands.
root@debian:~# umount /vpbx_dataroot@debian:~# drbdadm secondary drbd0Change the secondary node to the primary node, by running this command on the Secondary Server.
root@debian:~# drbdadm primary drbd0 --forceIn the Secondary Server, mount the volume and check if the data is available with the following command.
root@debian:~# mount /dev/drbd0 /vpbx_dataroot@debian:~# ls -l /vpbx_dataThe command should return something like this.
total 0-rw-r--r-- 1 root root 0 Nov 17 11:28 file1-rw-r--r-- 1 root root 0 Nov 17 11:28 file2-rw-r--r-- 1 root root 0 Nov 17 11:28 file3-rw-r--r-- 1 root root 0 Nov 17 11:28 file4-rw-r--r-- 1 root root 0 Nov 17 11:28 file5As you can see the data is being replicated, since these files were created in the Primary Server, and we are seeing them in the Secondary Server.
Now, let’s normalize the Secondary Server. Unmount the volume drbd0 and set it as the secondary node. In the Secondary Server, run the following commands.
root@debian:~# umount /vpbx_dataroot@debian:~# drbdadm secondary drbd0Then, normalize the Primary Server. Turn it into the primary node, and mount the drbd0 volume to the /vpbx_data directory. In the Primary Server, run the following commands.
root@debian:~# drbdadm primary drbd0root@debian:~# mount /dev/drbd0 /vpbx_dataWith the replication working, let’s configure the cluster for high availability. Create a password for the hacluster user on both servers.
root@debian:~# echo hacluster:Mypassword | chpasswdNote: The hacluster password can be anything of your liking. This does not have to be a password for the root or any other user.
Then, start the PCS service on both servers, using the following command.
root@debian:~# systemctl start pcsdWe must enable the PCS, Corosync, and Pacemaker services to start on both servers, with the following commands.
root@debian:~# systemctl enable pcsd.serviceroot@debian:~# systemctl enable corosync.serviceroot@debian:~# systemctl enable pacemaker.serviceNow, let’s authenticate as the hacluster user using PCS Auth in the Primary Server. Enter the following commands.
root@debian:~# pcs cluster destroyroot@debian:~# pcs host auth vitalpbx-primary.local vitalpbx-secondary.local -u hacluster -p MypasswordThe command should return the following.
vitalpbx-primary.local: Authorizedvitalpbx-secondary.local: AuthorizedNext, use the PCS cluster setup command in the Primary Server to generate and synchronize the corosync configuration.
root@debian:~# pcs cluster setup cluster_vitalpbx vitalpbx-primary.local vitalpbxsecondary.local --forceStart the cluster in the Primary Server, with the following commands.
root@debian:~# pcs cluster start --allroot@debian:~# pcs cluster enable --allroot@debian:~# pcs property set stonith-enabled=falseroot@debian:~# pcs property set no-quorum-policy=ignoreNote: It’s recommended to prevent resources from moving after recovery. In most circumstances, it is highly desirable to prevent healthy resources from being moved around the cluster. Moving resources always requires a period of downtime. For complex services such as databases, this period can be quite
long.
To prevent resources from moving after recovery, run this command in the Primary Server.
root@debian:~# pcs resource defaults update resource-stickiness=INFINITYNow, create the resource for the use of a Floating IP Address, with the following commands in the Primary Server.
root@debian:~# pcs resource create ClusterIP ocf:heartbeat:IPaddr2 ip=192.168.10.30cidr_netmask=24 op monitor interval=30s on-fail=restartroot@debian:~# pcs cluster cib drbd_cfgroot@debian:~# pcs cluster cib-push drbd_cfg --configThen, create the resource to use DRBD. use the following commands in the Primary Server.
root@debian:~# pcs cluster cib drbd_cfgroot@debian:~# pcs -f drbd_cfg resource create DrbdData ocf:linbit:drbd drbd_resource=drbd0op monitor interval=60sroot@debian:~# pcs -f drbd_cfg resource promotable DrbdData promoted-max=1 promoted-nodemax=1 clone-max=2 clone-node-max=1 notify=trueroot@debian:~# pcs cluster cib fs_cfgroot@debian:~# pcs cluster cib-push drbd_cfg --configNext, create the file system for the automated mount point, using the following commands in the Primary Server.
root@debian:~# pcs cluster cib fs_cfgroot@debian:~# pcs -f fs_cfg resource create DrbdFS Filesystem device="/dev/drbd0"directory="/vpbx_data" fstype="xfs"root@debian:~# pcs -f fs_cfg constraint colocation add DrbdFS with DrbdData-clone INFINITYwith-rsc-role=Masterroot@debian:~# pcs -f fs_cfg constraint order promote DrbdData-clone then start DrbdFSroot@debian:~# pcs -f fs_cfg constraint colocation add DrbdFS with ClusterIP INFINITYroot@debian:~# pcs -f fs_cfg constraint order DrbdData-clone then DrbdFSroot@debian:~# pcs cluster cib-push fs_cfg --configStop and disable all services on both servers, using the following commands.
root@debian:~# systemctl stop mariadbroot@debian:~# systemctl disable mariadbroot@debian:~# systemctl stop fail2banroot@debian:~# systemctl disable fail2banroot@debian:~# systemctl stop asteriskroot@debian:~# systemctl disable asteriskroot@debian:~# systemctl stop vpbx-monitorroot@debian:~# systemctl disable vpbx-monitorCreate the resource for the use of MariaDB in the Primary Server, using the following commands.
root@debian:~# mkdir /vpbx_data/mysqlroot@debian:~# mkdir /vpbx_data/mysql/dataroot@debian:~# cp -aR /var/lib/mysql/* /vpbx_data/mysql/dataroot@debian:~# chown -R mysql:mysql /vpbx_data/mysqlroot@debian:~# sed -i 's/var\/lib\/mysql/vpbx_data\/mysql\/data/g' /etc/mysql/mariadb.conf.d/50-server.cnfChange the MariaDB Path on the Secondary Server as well, using the following command.
root@debian:~# sed -i 's/var\/lib\/mysql/vpbx_data\/mysql\/data/g' /etc/mysql/mariadb.conf.d/50-server.cnfNow, run the following commands in the Primary Server to create the MariaDB resource.
root@debian:~# pcs resource create mysql service:mariadb op monitor interval=30sroot@debian:~# pcs cluster cib fs_cfgroot@debian:~# pcs cluster cib-push fs_cfg --configroot@debian:~# pcs -f fs_cfg constraint colocation add mysql with ClusterIP INFINITYroot@debian:~# pcs -f fs_cfg constraint order DrbdFS then mysqlroot@debian:~# pcs cluster cib-push fs_cfg --configSet the paths for the Asterisk service in both servers, using the following commands.
root@debian:~# sed -i 's/RestartSec=10/RestartSec=1/g' /usr/lib/systemd/system/asterisk.serviceroot@debian:~# sed -i 's/Wants=mariadb.service/#Wants=mariadb.service/g' /usr/lib/systemd/system/asterisk.serviceroot@debian:~# sed -i 's/After=mariadb.service/#After=mariadb.service/g' /usr/lib/systemd/system/asterisk.serviceNext, create the resource for Asterisk in the Primary Server, using the following commands.
root@debian:~# pcs resource create asterisk service:asterisk op monitor interval=30sroot@debian:~# pcs cluster cib fs_cfgroot@debian:~# pcs cluster cib-push fs_cfg --configroot@debian:~# pcs -f fs_cfg constraint colocation add asterisk with ClusterIP INFINITYroot@debian:~# pcs -f fs_cfg constraint order mysql then asteriskroot@debian:~# pcs cluster cib-push fs_cfg --configroot@debian:~# pcs resource update asterisk op stop timeout=120sroot@debian:~# pcs resource update asterisk op start timeout=120sroot@debian:~# pcs resource update asterisk op restart timeout=120sCopy the Asterisk and VitalPBX folders and files to the DRBD partition in the Primary Server using the following commands.
root@debian:~# tar -zcvf var-asterisk.tgz /var/log/asteriskroot@debian:~# tar -zcvf var-lib-asterisk.tgz /var/lib/asteriskroot@debian:~# tar -zcvf var-lib-vitalpbx.tgz /var/lib/vitalpbxroot@debian:~# tar -zcvf etc-vitalpbx.tgz /etc/vitalpbxroot@debian:~# tar -zcvf usr-lib-asterisk.tgz /usr/lib/asteriskroot@debian:~# tar -zcvf var-spool-asterisk.tgz /var/spool/asteriskroot@debian:~# tar -zcvf etc-asterisk.tgz /etc/asteriskroot@debian:~# tar xvfz var-asterisk.tgz -C /vpbx_dataroot@debian:~# tar xvfz var-lib-asterisk.tgz -C /vpbx_dataroot@debian:~# tar xvfz var-lib-vitalpbx.tgz -C /vpbx_dataroot@debian:~# tar xvfz etc-vitalpbx.tgz -C /vpbx_dataroot@debian:~# tar xvfz usr-lib-asterisk.tgz -C /vpbx_dataroot@debian:~# tar xvfz var-spool-asterisk.tgz -C /vpbx_dataroot@debian:~# tar xvfz etc-asterisk.tgz -C /vpbx_dataroot@debian:~# chmod -R 775 /vpbx_data/var/log/asteriskroot@debian:~# rm -rf /var/log/asteriskroot@debian:~# rm -rf /var/lib/asteriskroot@debian:~# rm -rf /var/lib/vitalpbxroot@debian:~# rm -rf /etc/vitalpbxroot@debian:~# rm -rf /usr/lib/asteriskroot@debian:~# rm -rf /var/spool/asteriskroot@debian:~# rm -rf /etc/asteriskroot@debian:~# ln -s /vpbx_data/var/log/asterisk /var/log/asteriskroot@debian:~# ln -s /vpbx_data/var/lib/asterisk /var/lib/asteriskroot@debian:~# ln -s /vpbx_data/var/lib/vitalpbx /var/lib/vitalpbxroot@debian:~# ln -s /vpbx_data/etc/vitalpbx /etc/vitalpbxroot@debian:~# ln -s /vpbx_data/usr/lib/asterisk /usr/lib/asteriskroot@debian:~# ln -s /vpbx_data/var/spool/asterisk /var/spool/asteriskroot@debian:~# ln -s /vpbx_data/etc/asterisk /etc/asteriskroot@debian:~# rm -rf var-asterisk.tgzroot@debian:~# rm -rf var-lib-asterisk.tgzroot@debian:~# rm -rf var-lib-vitalpbx.tgzroot@debian:~# rm -rf etc-vitalpbx.tgzroot@debian:~# rm -rf usr-lib-asterisk.tgzroot@debian:~# rm -rf var-spool-asterisk.tgzroot@debian:~# rm -rf etc-asterisk.tgzNow, configure the symbolic links on the Secondary Server with the following commands.
root@debian:~# rm -rf /var/log/asteriskroot@debian:~# rm -rf /var/lib/asteriskroot@debian:~# rm -rf /var/lib/vitalpbxroot@debian:~# rm -rf /etc/vitalpbxroot@debian:~# rm -rf /usr/lib/asteriskroot@debian:~# rm -rf /var/spool/asteriskroot@debian:~# rm -rf /etc/asteriskroot@debian:~# ln -s /vpbx_data/var/log/asterisk /var/log/asteriskroot@debian:~# ln -s /vpbx_data/var/lib/asterisk /var/lib/asteriskroot@debian:~# ln -s /vpbx_data/var/lib/vitalpbx /var/lib/vitalpbxroot@debian:~# ln -s /vpbx_data/etc/vitalpbx /etc/vitalpbxroot@debian:~# ln -s /vpbx_data/usr/lib/asterisk /usr/lib/asteriskroot@debian:~# ln -s /vpbx_data/var/spool/asterisk /var/spool/asteriskroot@debian:~# ln -s /vpbx_data/etc/asterisk /etc/asteriskThen, create the VitalPBX Service in the Primary Server, using the following commands.
root@debian:~# pcs resource create vpbx-monitor service:vpbx-monitor op monitor interval=30sroot@debian:~# pcs cluster cib fs_cfgroot@debian:~# pcs cluster cib-push fs_cfg --configroot@debian:~# pcs -f fs_cfg constraint colocation add vpbx-monitor with ClusterIP INFINITYroot@debian:~# pcs -f fs_cfg constraint order asterisk then vpbx-monitorroot@debian:~# pcs cluster cib-push fs_cfg --configCreate the Fail2Ban Service in the Primary Server, using the following commands.
root@debian:~# pcs resource create fail2ban service:fail2ban op monitor interval=30sroot@debian:~# pcs cluster cib fs_cfgroot@debian:~# pcs cluster cib-push fs_cfg --configroot@debian:~# pcs -f fs_cfg constraint colocation add fail2ban with ClusterIP INFINITYroot@debian:~# pcs -f fs_cfg constraint order asterisk then fail2banroot@debian:~# pcs cluster cib-push fs_cfg --configInitialize the Corosync and Pacemaker services in the Secondary Server with the following commands.
root@debian:~# systemctl restart corosync.serviceroot@debian:~# systemctl restart pacemaker.serviceNote: All configurations are stored in the /var/lib/pacemaker/cib/cib.xml file.
Now let’s see the cluster status by running the following command in the Primary Server.
root@debian:~# pcs status resourcesThis command will return the following.
* ClusterIP(ocf::heartbeat:IPaddr2): Started vitalpbx-primary.local* Clone Set: DrbdData-clone [DrbdData] (promotable): * Masters: [ vitalpbx-primary.local ] * Slaves: [ vitalpbx-secondary.local ]* DrbdFS (ocf::heartbeat:Filesystem): Started vitalpbx-primary.local* mysql (service:mysql): Started vitalpbx-primary.local* asterisk (service:asterisk): Started vitalpbx-primary.local* vpbx-monitor (service:vpbx-monitor): Started vitalpbx-primary.local* fail2ban (service:fail2ban): Started vitalpbx-primary.localNote: Before doing any high availability testing, make sure that the data has finished synchronizing. To do this, use the cat /proc/drbd command.
With our cluster configured, we now must configure the bind address. Managing the bind address is critical when using multiple IP addresses on the same NIC (Network Interface Card).
This is our case when using a Floating IP address in this HA cluster. In this circumstance, Asterisk has a habit of listening for SIP/IAX on the virtual IP address, but replying on the base address of the NIC, causing phones and trunks to fail to register.
In the Primary Server, go to Settings > Technology Settings >PJSIP Settings, and configure
the Floating IP address in the Bind and TLS Bind fields.
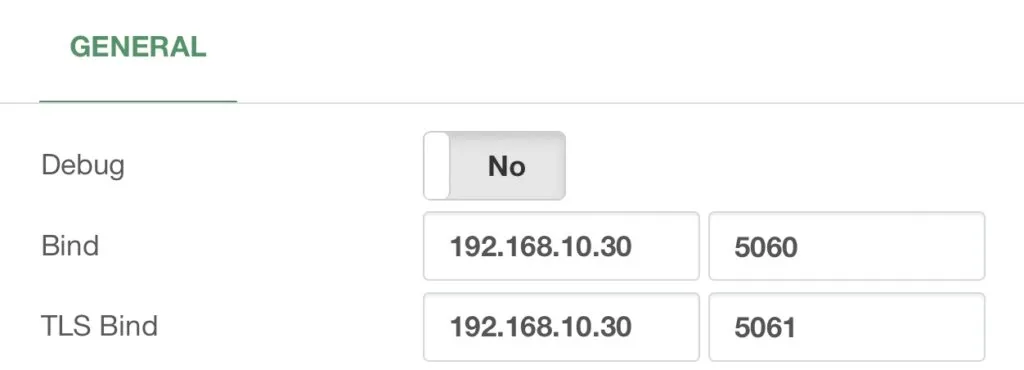
Now that the Bind address is set. We will create the Bascul command in both servers. This command will allow us to easily move the services between nodes. This will essentially allow us to move between the Primary and Secondary Servers.
To start creating the bascul command, we can begin by downloading the following file using wget on both servers.
root@debian:~# wget https://raw.githubusercontent.com/VitalPBX/vitalpbx4_drbd_ha/main/basculOr we can create it from scratch using nano on both servers.
root@debian:~# nano basculAnd add the following content.
#!/bin/bash# This code is the property of VitalPBX, LLC# License: Proprietary# Date: 1-Aug-2023# Change the status of the servers, the Master goes to Standby and the Standby becomesMaster.#Function to draw a progress bar#You must pass as an argument the number of seconds that the progress bar will run#progress-bar 10 --> It will generate a progress bar that will run per 10 secondsset -eprogress-bar() { local duration=${1} already_done() { for ((done=0; done<$elapsed; done++)); do printf ">"; done } remaining() { for ((remain=$elapsed; remain<$duration; remain++)); do printf " ";done } percentage() { printf "| %s%%" $(( (($elapsed)*100)/($duration)*100/100 )); } clean_line() { printf "\r"; } for (( elapsed=1; elapsed<=$duration; elapsed++ )); do already_done; remaining; percentage sleep 1 clean_line done clean_line}server_a=`pcs status | awk 'NR==11 {print $4}'`server_b=`pcs status | awk 'NR==11 {print $5}'`server_master=`pcs status resources | awk 'NR==1 {print $5}'`#Perform validationsif [ "${server_a}" = "" ] || [ "${server_b}" = "" ]thenecho -e "\e[41m There are problems with high availability, please check with the command*pcs status* (we recommend applying the command *pcs cluster unstandby* in both servers) \e[0m" exit;fiif [[ "${server_master}" = "${server_a}" ]]; then host_master=$server_a host_standby=$server_belse host_master=$server_b host_standby=$server_afiarg=$1if [ "$arg" = 'yes' ] ;then perform_bascul='yes'fi# Print a warning message and ask the user if they want to continueecho -e "************************************************************"echo -e "* Change the roles of servers in high availability *"echo -e "*\e[41m WARNING-WARNING-WARNING-WARNING-WARNING-WARNING-WARNING \e[0m*"echo -e "*All calls in progress will be lost and the system will be *"echo -e "* be in an unavailable state for a few seconds. *"echo -e "************************************************************"#Perform a loop until the users confirm if they want to proceed or notwhile [[ $perform_bascul != yes && $perform_bascul != no ]]; do read -p "Are you sure to switch from $host_master to $host_standby? (yes, no) > "perform_basculdoneif [[ "${perform_bascul}" = "yes" ]]; then #Unstandby both nodes pcs node unstandby $host_master pcs node unstandby $host_standby #Do a loop per resource pcs status resources | awk '{print $2}' | while read -r resource ; do #Skip moving the ClusterIP resource, it will be moved at the endif [[ "${resource}" != "ClusterIP" ]] && [[ "${resource}" != "Clone" ]] && [["${resource}" != "Masters:" ]] && [[ "${resource}" != "Slaves:" ]]; then echo "Moving ${resource} from ${host_master} to ${host_standby}" pcs resource move ${resource} ${host_standby} fi done sleep 5 && pcs node standby $host_master & #Standby current Master node after fiveseconds sleep 20 && pcs node unstandby $host_master & #Automatically Unstandby current Masternode after$ #Move the ClusterIP resource to the standby node echo "Moving ClusterIP from ${host_master} to ${host_standby}" pcs resource move ClusterIP ${host_standby} #End the script echo "Turning ${host_standby} to Master" progress-bar 10 echo "Done"else echo "Nothing to do, bye, bye"fisleep 15roleSave and Exit nano. Next, add permissions and move to the /usr/local/bin directory using the following commands in both servers.
root@debian:~# chmod +x basculroot@debian:~# mv bascul /usr/local/binNow, create the Role command in both servers. You can download the following file using wget.
root@debian:~# wget https://raw.githubusercontent.com/VitalPBX/vitalpbx4_drbd_ha/main/roleOr you can create the file using nano on both servers.
root@debian:~# nano roleAdd the following content.
#!/bin/bash# This code is the property of VitalPBX, LLC# License: Proprietary# Date: 10-oct-2022# Show the Role of the Server.#Bash Color Codesgreen="\033[00;32m"txtrst="\033[00;0m"linux_ver=`cat /etc/os-release | grep -e PRETTY_NAME | awk -F '=' '{print $2}' | xargs`vpbx_version=`aptitude versions vitalpbx | awk '{ print $2 }'`server_master=`pcs status resources | awk 'NR==1 {print $5}'`host=`hostname`if [[ "${server_master}" = "${host}" ]]; then server_mode="Master"else server_mode="Standby"filogo=' _ _ _ _ ______ ______ _ _| | | (_)_ | (_____ (____ \ \ / /| | | |_| |_ ____| |_____) )___) ) \/ / \ \/ /| | _)/ _ | | ____/ __ ( ) ( \ / | | |_( ( | | | | | |__) ) /\ \\ \/ |_|___)_||_|_|_| |______/_/ _\\'echo -e "${green}${logo}${txtrst} Role : $server_mode Version : ${vpbx_version//[[:space:]]} Asterisk : `asterisk -rx "core show version" 2>/dev/null| grep -ohe 'Asterisk [0-9.]*'` Linux Version : ${linux_ver} Welcome to : `hostname` Uptime : `uptime | grep -ohe 'up .*' | sed 's/up //g' | awk -F "," '{print $1}'` Load : `uptime | grep -ohe 'load average[s:][: ].*' | awk '{ print "Last Minute: " $3" Last 5 Minutes: "$4" Last 15 Minutes "$5 }'` Users : `uptime | grep -ohe '[0-9.*] user[s,]'` IP Address : ${green}`ip addr | sed -En 's/127.0.0.1//;s/.*inet (addr:)?(([0-9]*\.){3}[0-9]*).*/\2/p' | xargs `${txtrst} Clock :`timedatectl | sed -n '/Local time/ s/^[ \t]*Local time:\(.*$\)/\1/p'` NTP Sync. :`timedatectl |awk -F: '/NTP service/ {print $2}'`"echo -e ""echo -e "************************************************************"echo -e "* Servers Status *"echo -e "************************************************************"echo -e "Master"pcs status resourcesecho -e ""echo -e "Servers Status"pcs cluster pcsd-statusSave and Exit nano. Next, we copy it to the /etc/profile.d/ and permissions directory using the following commands on both servers.
root@debian:~# cp -rf role /etc/profile.d/vitalwelcome.shroot@debian:~# chmod 755 /etc/profile.d/vitalwelcome.shNow, add execution permissions and move to the /usr/local/bin directory using the following commands on both servers.
root@debian:~# chmod +x roleroot@debian:~# mv role /usr/local/binAfterward, we will create the drbdsplit command in both servers. Split-B****rain can be caused by intervention by cluster management software or human error during a period of failure for network links between cluster nodes, causing both nodes to switch to the primary role while disconnected. Split-brain occurs when both high availability nodes switch into the primary role while disconnected. This behavior can allow data to be modified on either node without being replicated on the peer, leading to two diverging sets of data on each node, which can be difficult to merge. The drbdsplit command allows us to recover from split-brain in case it ever happens to us. To create the drbdsplit command, we can download the following file using the wget command on both servers.
root@debian:~# wget https://raw.githubusercontent.com/VitalPBX/vitalpbx4_drbd_ha/main/drbdsplitOr we can create it from scratch using nano on both servers.
root@debian:~# nano drbdsplitAdd the following content.
#!/bin/bashset -e# This code is the property of VitalPBX, LLC# License: Proprietary# Date: 1-Agu-2023# DRBD split-brain recovery#drbdadm secondary drbd0drbdadm disconnect drbd0drbdadm -- --discard-my-data connect drbd0echo "Disk Status"drbdadm statusSave and Exit nano. Now, add permissions and move it to the /usr/local/bin directory using the following commands on both servers.
root@debian:~# chmod +x drbdsplitroot@debian:~# mv drbdsplit /usr/local/binWith this, you have a full high availability environment! CONGRATULATIONS, you now have high availability with VitalPBX 4.
Was this article helpful?
Your feedback helps us improve the documentation.
Thank you for helping us improve!