
How to Create an Extension/Device for VitXi WebRTC
To register a VitXi WebRTC user with VitalPBX, you first need to create an extension configured specifically for WebRTC communication.
This ensures proper signaling, secure media transport, and compatibility with browser-based SIP clients.
Access the Extensions Module
Section titled “Access the Extensions Module”-
Log in to your VitalPBX Administration Panel.
-
Navigate to: PBX/Extensions/Extensions
Configure the Extension
Section titled “Configure the Extension”When creating the new extension, set the following required parameters:
| Field | Recommended Value | Description |
|---|---|---|
| Technology | PJSIP | Required for WebRTC operation. |
| Profile | Default WebRTC Profile | Uses the WebRTC configuration you set earlier. |
| WebRTC Client | Yes | Enables WebRTC-specific settings such as WSS transport and DTLS-SRTP. |
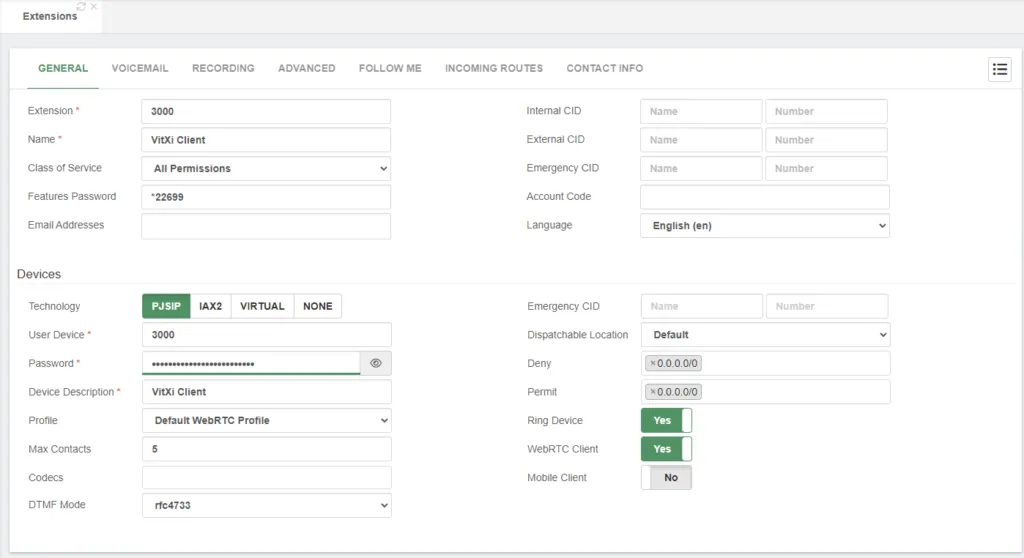
You may also configure additional settings like voicemail, features password, and display name according to your organizational needs.
Save and Apply Changes
Section titled “Save and Apply Changes”Once all parameters are configured:
-
Click Save to store the new extension.
-
Then click Apply Changes to activate it.
If you don’t apply the changes, the new WebRTC extension will not be registered in Asterisk.
Next Steps
Section titled “Next Steps”Your new WebRTC-enabled extension is now ready to be used by a VitXi user.
In the next section, you’ll learn how to create a VitXi user and assign this extension/device within VitalPBX for browser-based communication.
Was this article helpful?
Your feedback helps us improve the documentation.
Thank you for helping us improve!