
How to Create a User and Assign an Extension
After completing the VitXi installation wizard and preparing your VitalPBX extensions, the next step is to create a VitXi user and assign a corresponding extension/device.
Each VitXi user is linked to a PJSIP WebRTC extension configured in VitalPBX.
1. Access the User Management Section
Section titled “1. Access the User Management Section”-
Log in to your VitXi Administrator Panel.
-
Navigate to Management → Users.
-
Click Create to open the new user form.
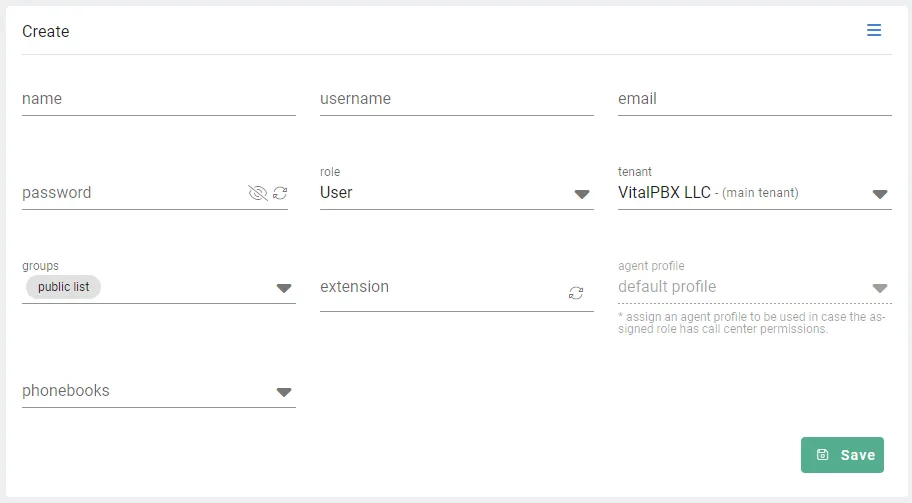
Configure User Information
Section titled “Configure User Information”Fill in the required fields to create the user:
| Field | Description |
|---|---|
| Name | The full name of the user. |
| Username | The username the user will use to log into VitXi WebRTC. |
| The email address associated with the user (used for password recovery and notifications). | |
| Password | The login password for the VitXi WebRTC account. |
| Role | Defines the user’s permissions and access level. See below for role details. |
| Tenant | The tenant or organization the user belongs to (useful for multi-tenant environments). |
| Groups | Assign one or more groups that the user will belong to. Grouping helps organize users and control access to shared features. |
| Extension | Select the VitalPBX extension/device created for this user (must be a PJSIP WebRTC-enabled device). |
| Agent Profile | Assign an agent profile if the user will perform call center activities such as login/logout, pause/unpause in queues. |
| Phonebooks | Select which phonebooks the user will have access to within VitXi. |
User Roles Explained
Section titled “User Roles Explained”VitXi provides different user roles, each with specific permissions and access levels:
| Role | Description |
|---|---|
| Super Administrator | Has full system access and can manage all users, tenants, and global settings. |
| Administrator | Can manage users and configurations within their assigned tenant. |
| User | Regular VitXi WebRTC end-user with access to standard communication features (chat, calls, voicemail, etc.). |
| Agent | Designed for call center environments. Enables interface icons for Login/Logout, Pause/Unpause, and Queue Management actions. |
Tip: If a user is part of a call center, select the Agent role and assign an Agent Profile to activate the proper interface features.
Save and Apply Changes
Section titled “Save and Apply Changes”Once all fields are completed:
-
Click Save to create the user.
-
The new user will appear in the user list.
This VitXi user can now log into the VitXi WebRTC interface using their username and password and will be automatically linked to their assigned VitalPBX extension/device.
Important: Make sure the assigned extension/device is active, WebRTC-enabled, and properly registered in VitalPBX.
Was this article helpful?
Your feedback helps us improve the documentation.
Thank you for helping us improve!