
Agent Profiles
When using Call Center Agents in VitXi WebRTC, it’s often necessary for each agent group to have its own configuration — for example, different pause types or CRM integrations.
To manage this, VitXi allows you to create and customize Agent Profiles, which can then be assigned to users based on their roles or responsibilities.
Access the Agent Profiles Module
Section titled “Access the Agent Profiles Module”-
Log in to the VitXi.
-
Navigate to Management → Agent Profiles.
-
You will see a list of existing profiles, including the Default Profile, which is created automatically.
The default profile cannot be deleted but can be edited.
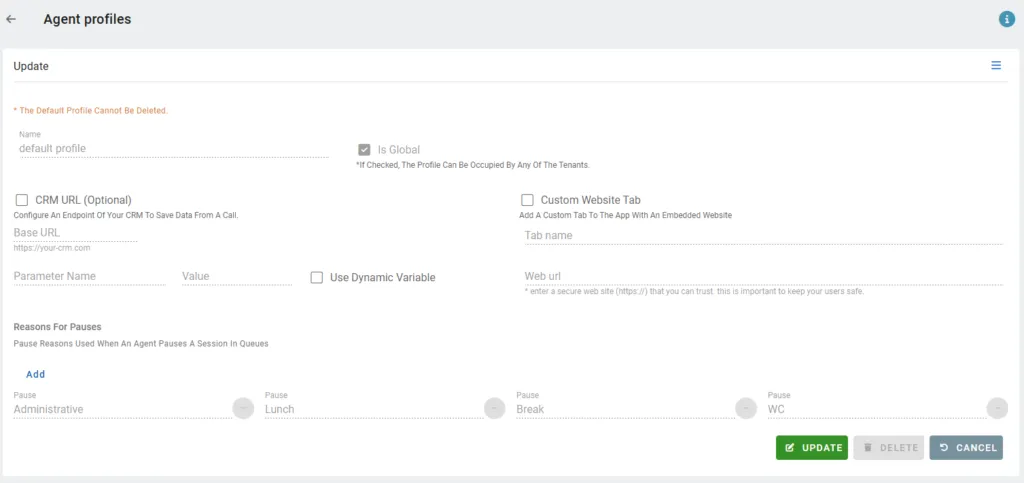
Creating or Editing an Agent Profile
When creating or modifying an Agent Profile, configure the following options:
| Field | Description |
|---|---|
| Name | The name of the profile (e.g., Sales Agents, Support Team). |
| Is Global | If checked, the profile will be available to all tenants. |
| CRM URL (Optional) | Allows integration with a CRM system by opening a dynamic or static URL with call parameters. |
| Custom Website Tab | Enables embedding an external website or dashboard directly inside VitXi. |
| Reasons for Pauses | Defines the possible reasons an agent can select when pausing (e.g., Lunch, Break, Administrative). |
CRM URL Integration
The CRM URL feature lets you configure a URL that can dynamically include call-related parameters.
Agents can use the CRM button within VitXi’s call interface to open the configured URL in a new tab or window, gaining instant access to relevant customer data.
Base Configuration
Section titled “Base Configuration”-
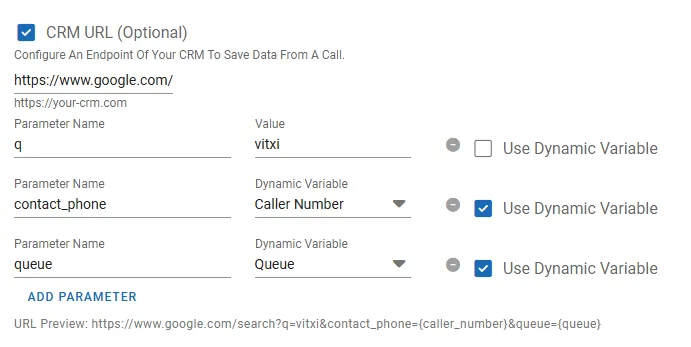
Enable the CRM URL (Optional) checkbox.
-
Enter a Base URL, such as:
-
Add Parameters to append to the base URL.
For example:
| Parameter Name | Value / Dynamic Variable | Description |
|---|---|---|
| q | vitxi |
Static parameter (search term). |
| contact_phone | Caller Number | Dynamic parameter that adapts to the current call. |
| queue | Queue | Dynamic parameter representing the queue source. |
The resulting URL would look like:
Dynamic Parameters
Section titled “Dynamic Parameters”VitXi supports dynamic variables that can be automatically replaced with real-time call data.
This allows CRM URLs to adapt to each specific call.
Available dynamic variables include:
-
Call Type
-
Caller Name
-
Caller Number
-
Callee Name
-
Callee Number
-
Queue
You can add as many parameters as needed to personalize your integration with CRMs or external systems.
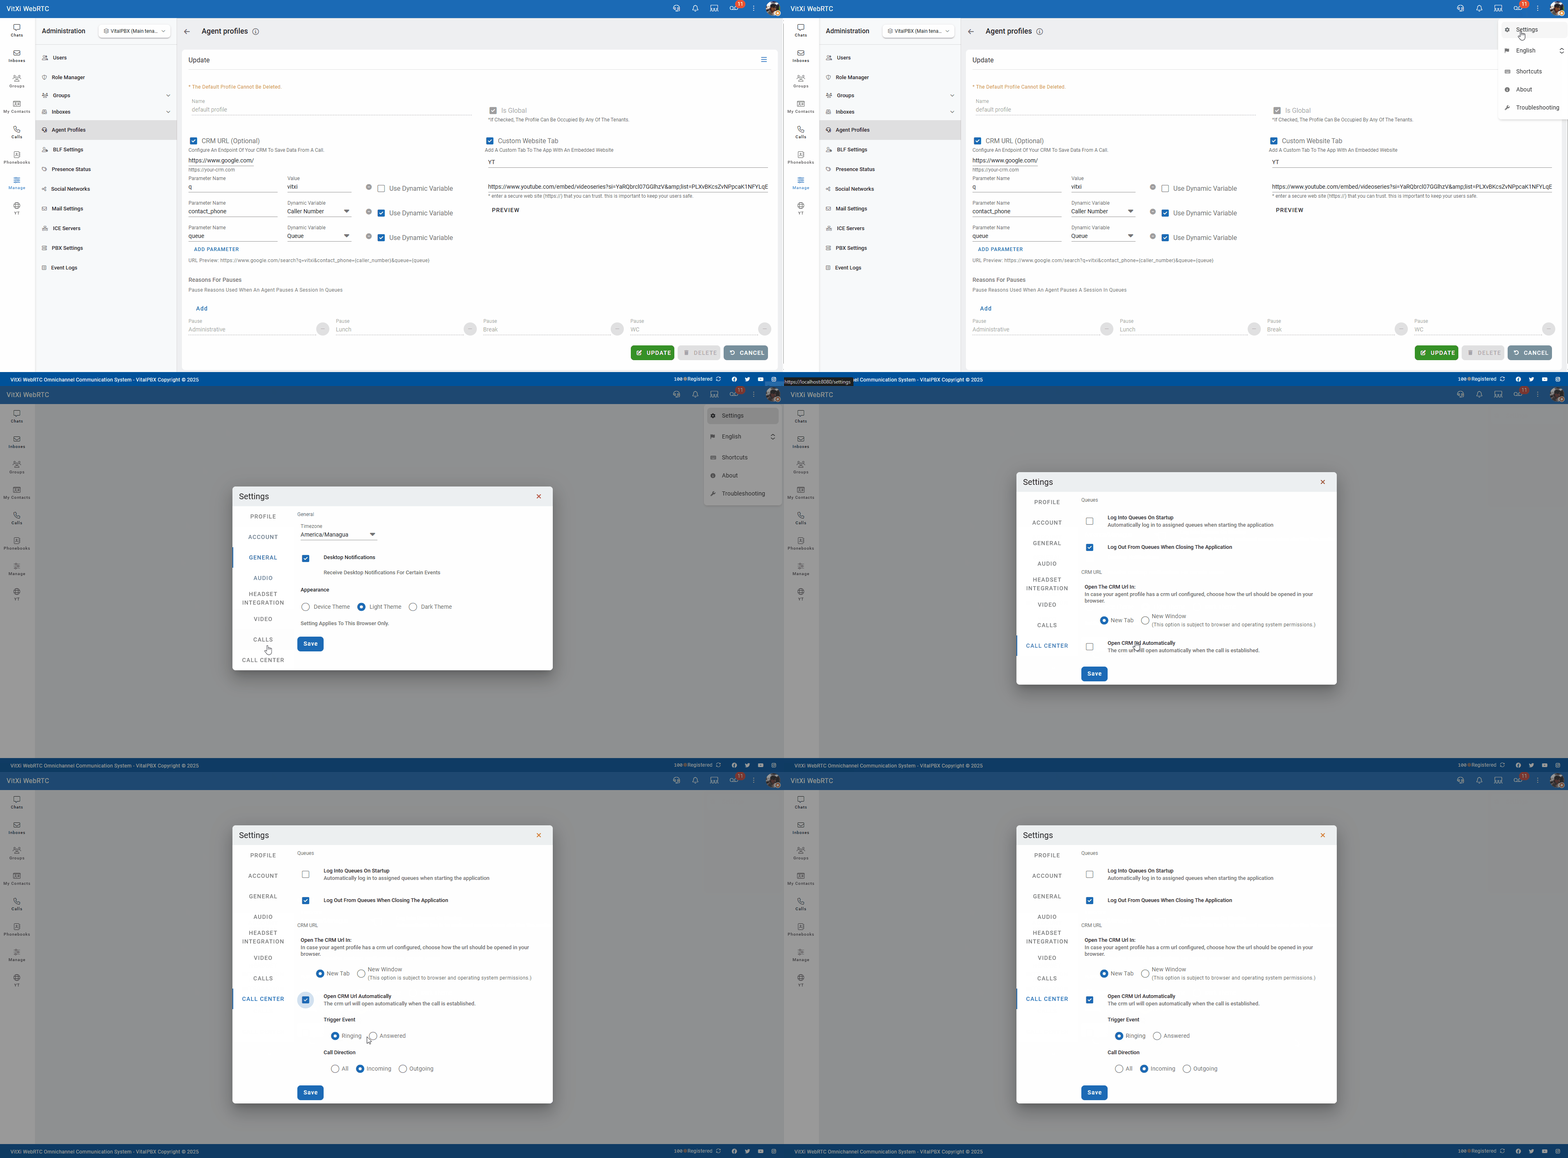
Agent CRM URL Settings
Each agent can control how CRM URLs behave during calls.
To access these settings:
-
In VitXi WebRTC, click on the three-dot menu icon (⋮) next to the profile picture → Settings → Call Center tab.
-
Under the CRM URL section, configure the following options:
| Option | Description |
|---|---|
| Open the CRM URL In | Choose between New Tab or New Window. |
| Open CRM URL Automatically | Automatically open the CRM page when a call event occurs. |
| Trigger Event | Select whether to open on Ringing or Answered. |
| Call Direction | Choose All, Incoming, or Outgoing calls. |
CRM URL Use Cases
Section titled “CRM URL Use Cases”Here are some common use cases for CRM URL integrations:
Display Caller Information Automatically
Section titled “Display Caller Information Automatically”When a call is received, VitXi opens the CRM page showing the caller’s profile, history, and notes — allowing agents to greet customers personally.
Automated Searches Based on Caller ID
Section titled “Automated Searches Based on Caller ID”Agents can click the CRM button to automatically perform a CRM search using the caller’s number, saving time and avoiding manual lookups.
Queue-Based Information Routing
Section titled “Queue-Based Information Routing”Calls from queues like Sales or Support can open CRM pages filtered by queue name, ensuring the agent accesses context-specific data.
Automatic URL Opening for Incoming Calls
Section titled “Automatic URL Opening for Incoming Calls”By setting the trigger event to Ringing and selecting Incoming Calls, the CRM page opens as soon as a call is detected — reducing wait times.
Custom Website Tab
Section titled “Custom Website Tab”In addition to CRM URLs, you can add a Custom Website Tab to embed an external webpage directly into VitXi.
This is useful for displaying dashboards, reports, or internal systems without leaving the app.
| Field | Description |
|---|---|
| Tab Name | Name displayed in the interface. |
| Web URL | The secure HTTPS URL of the website to embed. |
⚠️ Use only trusted and secure (HTTPS) URLs to protect user data and maintain browser security compliance.
Reasons for Pauses
Section titled “Reasons for Pauses”Define the list of pause reasons available to agents in the call center interface.
These reasons help categorize agent status when they are unavailable for calls.
Common examples include:
-
Administrative
-
Lunch
-
Break
-
WC
To add a pause reason:
-
Click Update to save changes.
-
Click Add under “Reasons for Pauses.”
-
Enter the name of the pause.
Was this article helpful?
Your feedback helps us improve the documentation.
Thank you for helping us improve!